Linux Netbeans configuration
Installing the IDE
Netbeans is an IDE written in Java, and the Java virtual machine is needed to use the IDE. By default most Linux distributions do not come with a jvm pre-installed, so you need to install one.
sudo apt-get install openjdk-7-jre # Install Java for Ubuntu/Debian
After that, you can install the Netbeans IDE. In theory, you could install it via apt-get, but in that way you will get the version of the IDE to write Java programs, not C/C++ programs. Even though you can install C/C++ support later, you will end up with an installation that requires far more disk space (up to several hundred megabytes). It is therefore best to download the IDE from the Netbeans website and install it manually. The download page will show many options depending on the programming language you are interested in. Among the possible versions choose the C/C++ version, because these are the languages used by Miosix.
The downloaded file has a .sh extension, and a name like netbeans-8.0-cpp-linux.sh. You can install it by opening a terminal and typing
sudo sh netbeans-8.0-cpp-linux.sh
a wizard will guide you through the installation.
Theme configuration
If you use Gnome the IDE will use the right theme out of the box, but if you use a different desktop environment, like KDE there is a trick to get the nice theme, which consists in editing the .desktop file for Netbeans, which by default is in /usr/share/applications/netbeans-8.0.desktop (if you have installed a version of the IDE different from 8.0, the name will change likewise) and change the Exec= line from
Exec=/bin/sh "/usr/local/netbeans-8.0/bin/netbeans"
to the following value which will force the IDE to use the nice Linux theme
Exec=/usr/local/netbeans-8.0/bin/netbeans --laf com.sun.java.swing.plaf.gtk.GTKLookAndFeel
To edit the configuration file, which is writable only by root, you can use nano or vi from a shell.
sudo nano /usr/share/applications/netbeans-8.0.desktop
Configuring the IDE
Netbeans is a generic C/C++ IDE, and once installed is not set up by default to develop for ARM microcontrollers and Miosix. So you need to configure it. This is a one-time step that you will have to do again only if you re-install the IDE.
Note: this assumes you have already installed the Miosix toolchain, if not read the Linux Quick Start tutorial first.
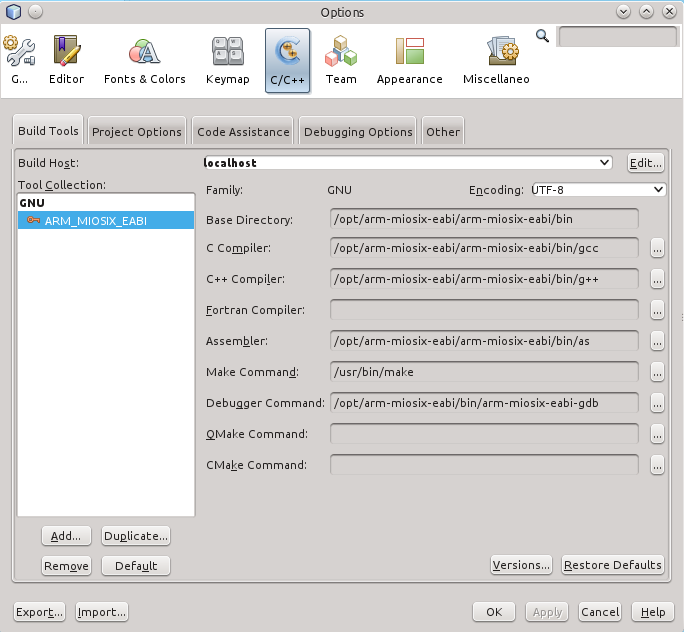
Open the Netbeans IDE and click on "Tools > Options". From the top of the options window select the C/C++ panel, and click the "Add" button to add a compiler to Netbeans. As "Base directory" choose "/opt/arm-miosix-eabi/arm-miosix-eabi/bin". Choose "GNU" as "Tool collection family", and "ARM_MIOSIX_EABI" as "Tool collection name". Note that you must use the "ARM_MIOSIX_EABI" name, or you'll have problems later. The C and C++ compiler should be automatically filled in by Netbeans, if not copy them from the screenshot below.
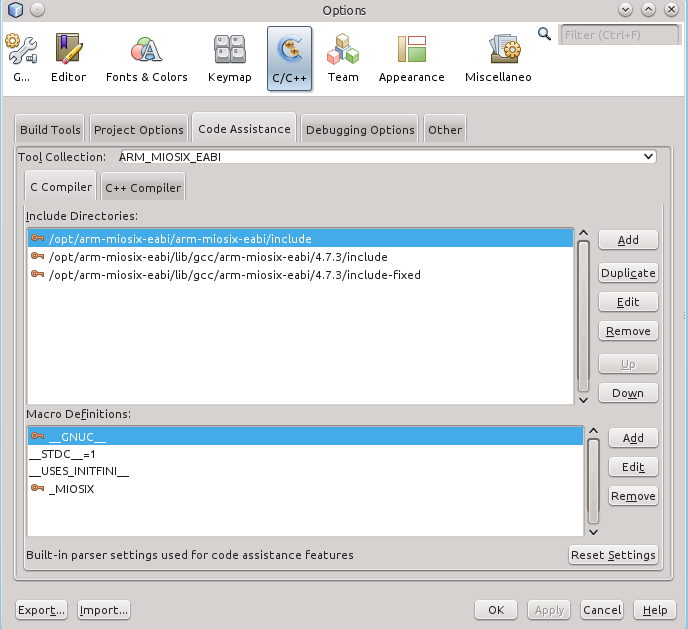
Last, you will need to set up the paths with the compiler libraries for code completion to work. Click on the "Code assistance" tab, and "C compiler" sub-tab. The list of folders and macro definitions should look like in this screenshot, if not, add the paths manually.
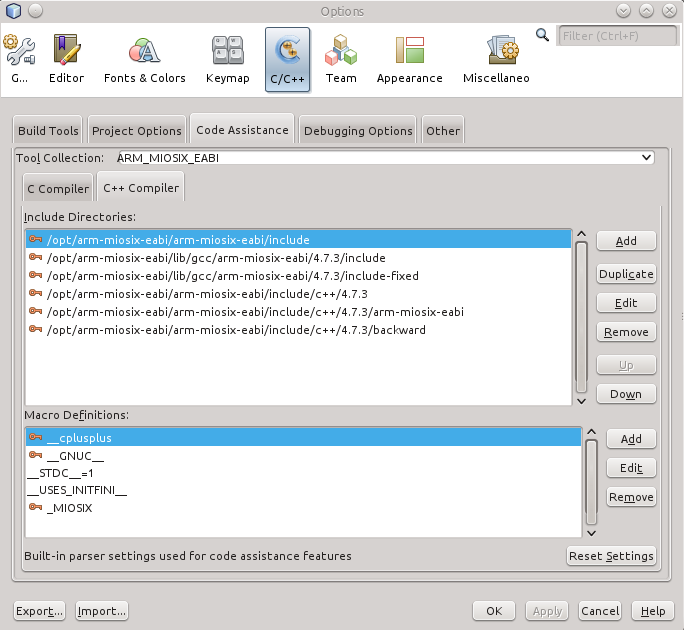
Then click th "C++ compiler" sub-tab and check if the paths and macro definitions are correct. If not add the missing paths manually as in the next screenshot.
Configuration is now complete. You can close the Options windows by clicking "Ok".
Building the Miosix kernel with Netbeans
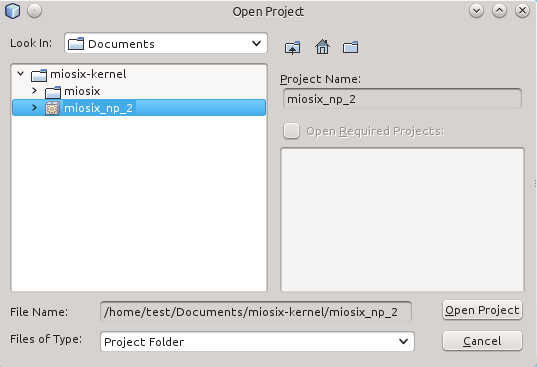
Select "File > Open project" and select the "miosix_np_2" directory withn the Miosix top level directory.
You may want to rename the project from the default "miosix_np_2" to the name of the project you are going to develop, by right clicking on the project name and selecting "Rename", once you have opened it.
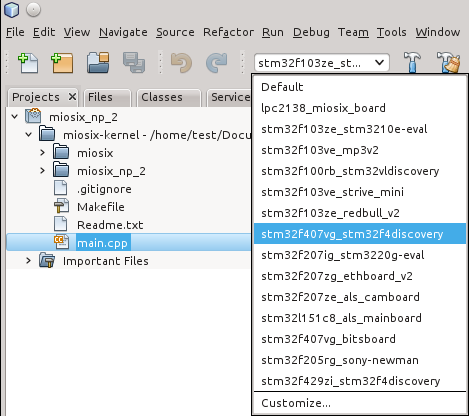
Miosix supports different boards, each of which has different board support packages and peripheral drivers. To get code completion support for your board you need to select it within the IDE, as in the following image
Please note that in the Linux Quick Start you had to select the board to compile for by editing the miosix/config/Makefile.inc. The board selection within the IDE does not replace the need to edit Makefile.inc, they serve two different purposes:
- Board selection within the IDE is used by the IDE to set up code completion for your board
- Board selection in Makefile.inc tells the kernel for which board it needs to be compiled.
However, please note that you can edit Makefile.inc and miosix/config/miosix_settings.h as regular source files within the IDE, without the need to use a standalone text editor.
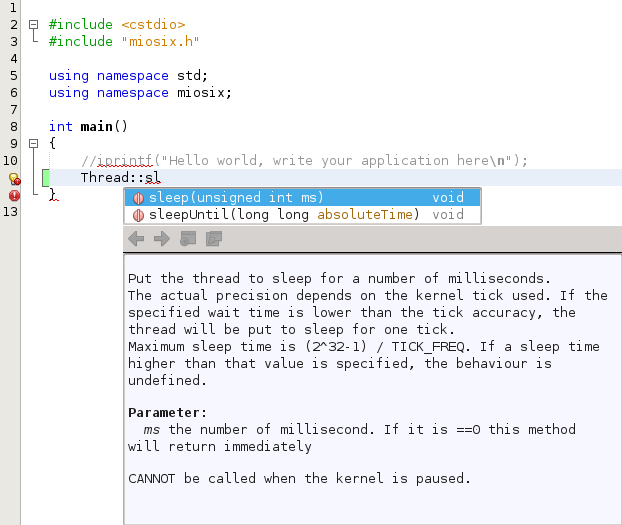
You can open main.cpp (double click on it from the left pane), and start typing your code. Code completion is invoked by typing the first letters of the function, variable, class or member function and hitting "Ctrl-space". Netbeans also integrates with Doxygen documentation, so you can see the documentation for Miosix classes and functions directly from the IDE.
Building is performed by clicking the hammer icon above the source code editor. The Output window will appear below the source editor showing the compilation progress and eventual compiler errors. There is no known way to transfer the compiled program on a microcontroller board directly from the IDE, for this you will have to use the QSTLink2 tool as explained in Linux Quick Start.
